Getting started
This page gets MeshBench installed and open. From there, your first simulation is fifteen minutes to a real network relaying real packets, and the concepts page explains what is real and what is modelled.
What you need#
Releases ship builds for Linux (AppImage), macOS (dmg) and Windows (zip); the notes below are for Linux, where MeshBench is developed. The per-platform notes cover the macOS and Windows signing caveats.
- glibc 2.35 or newer: Ubuntu 22.04, Debian 12, RHEL 9, or anything more recent.
- A display and a GPU. The CPU path gives the same answers more slowly, so a machine without a usable GPU loses time rather than features.
- RAM: about 500 MB for the application, plus roughly 10 MB per simulated node. The 378-node network wants about 4 GB free.
- Disk: 200 MB for the bundle, and a cache under
~/.cache/meshbench. Budget about 1 GB for a first session: the network the workbench opens with covers Scotland and Ireland, and the ground under its links is roughly 500 MB of terrain that arrives on first launch. After that the cache grows only with the firmware builds and map tiles you actually use. - Bandwidth on the first run. That terrain is fetched before you have done anything else, so a metered connection is worth knowing about in advance. Opening a smaller network first, or starting with
-fixture "", avoids it.
Install and launch#
- Download
meshbench-linux-x86_64-bundled.tar.gzfrom the download page, which picks the right file for the machine you are reading on, or from the releases page. - Unpack it anywhere you can write to.
``
console
tar xzf meshbench-linux-x86_64-bundled.tar.gz
cd meshbench
`` - Run it.
``
console
./meshbench workbench
``
There is no installer, no root, and nothing to configure. Firmware builds and map tiles download on first use; the emulators sit beside the binary and are found automatically.
Every asset comes in two forms, and the name says which. bundled carries QEMU and Renode with it, so an emulated board boots on first run - about 118 MB, and the right answer for a one-off download. compact is the application alone, about a quarter of the size, and fetches the emulators through Configuration > Setup when you first want one.
There is also apt install meshbench and brew install --cask meshbench, where the plain name is the compact build because a package manager re-downloads it every release; meshbench-bundled is the other one. The download page has the commands.
The first launch is the slow one. The workbench opens on a network spanning Scotland and Ireland and measures every link in it, which means fetching the terrain underneath: roughly 500 MB, before you have clicked anything. The status line names the download and prices it as it goes - fetching terrain, 43 MB of about 499 MB - so a percentage that barely moves early on is the megabytes arriving rather than a stall. The job can be stopped, and the measurement carries on over whatever has already landed.
The workbench opens on the Plan view with a map. You are ready for your first simulation.
Finding the manual again#
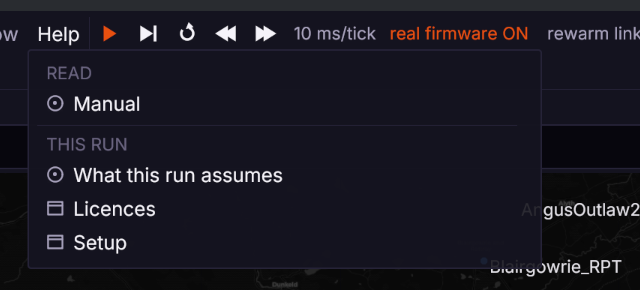
Help > Manual opens this site in your browser, from inside the application. Everything else in that menu is about the run in front of you: What this run assumes goes to the settings that decide how kind the model is being, Licences to what the application and everything it carries are licensed under, and Setup to what this machine has downloaded and what it has not.
Next#
- Your first simulation: load a real network, boot the firmware, watch a flood.
- What is real, and what is modelled: the mental model, and the project's terminology.
- Shipped networks if you want a bigger or more realistic mesh.
- The CLI reference for everything the binary does without a window, and Settings for what the application remembers.
- External tools for what MeshBench looks for on the machine: Wireshark, SDR++, the emulators, and what happens when one is missing.
If it will not start#
| symptom | cause |
|---|---|
version GLIBC_2.35 not found | the distribution is older than the floor above |
Cannot set swap interval | harmless, printed when the compositor declines vsync |
| a window opens and stays black | no usable GL driver; install your vendor's Mesa or driver package |
One bundle oddity worth knowing before rearranging files: qemu-system-xtensa (the board emulator, used later by emulation) is a symlink on purpose. QEMU resolves its own path to find its data files, so a bare copy of the binary will not run.
Building from source, any platform#
git clone https://github.com/MeshBench/meshbench
cd meshbench
go build ./cmd/meshbenchThat produces a binary called meshbench, the same program the release ships.
Needs Go 1.25 and a C toolchain with GL and X11 development headers, because the UI is cgo. On Debian and Ubuntu:
sudo apt install gcc pkg-config libgl1-mesa-dev xorg-devmacOS and Windows#
Both ship in every release: a .dmg and a plain .zip you unpack and run. Neither is signed yet, so the first launch needs the usual unsigned-app step, described with each platform's caveats in the install notes. Emulated boards are Linux-first; the native firmware path, which every study and CI gate uses, has no platform-specific parts.